Setting the screeds

Screed angle (angle of attack)
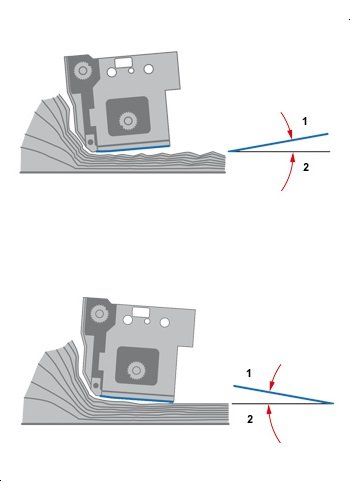
The attack angle of the paver's screed, also known as the planing angle, is an important parameter that affects the asphalt paving process and the quality of the resulting road surface. The angle of attack determines the angle of inclination of the front part of the screed where it comes into contact with the material.
It has a direct effect on two key aspects of the paving process:
Compactness: The angle of attack determines how far the board penetrates the material during paving. A steeper angle of attack can provide a greater degree of pre-compaction of the material, which contributes to a stronger and denser road surface.
Material placement: The angle of attack also affects the ability of the board to control material placement during paving. A steeper angle of attack can help prevent the material from spreading sideways, providing more precise placement and control of the pavement profile.
The angle of attack can be adjusted depending on the desired paving conditions and material properties. Different types of pavers and screeds can be supplied with different ranges and settings of the attack angle, enabling the paving process to be tailored to the specific requirements of the project.
The optimum angle of attack depends on many factors, including type of material used, asphalt thickness, paver speed and pavement quality requirements. Professional paver operators usually have the experience and knowledge to adjust the angle of attack to the specific conditions and requirements of the project to achieve optimum paving results.
Wear and tear of screeds
Asphalt paver screeds undergo wear during operation due to the abrasive nature of materials. Examples of wear include:
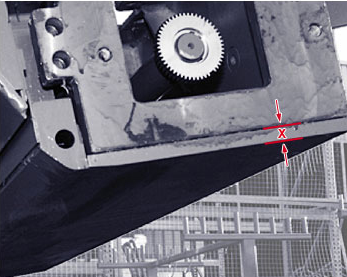
Plate Wear: The screed plates experience gradual abrasion and erosion from contact with aggregates, resulting in surface irregularities and reduced performance.
Tamper Bar Wear: Tamper bars, responsible for material compaction, wear out over time, leading to reduced compaction efficiency and potential surface imperfections.
Heating Element Wear: The heating elements in the screed can deteriorate over time due to exposure to extreme temperatures, affecting their ability to maintain consistent screed temperature.
Edge Wear: The edges of the screed plates may wear more rapidly, resulting in unevenness along the pavement edges and compromising the quality of the finished surface.
To mitigate wear, regular inspections, proper maintenance, and timely replacement of worn components are essential. By addressing wear issues promptly, asphalt paver operators can ensure optimal performance, minimize surface defects, and extend the lifespan of their screeds.
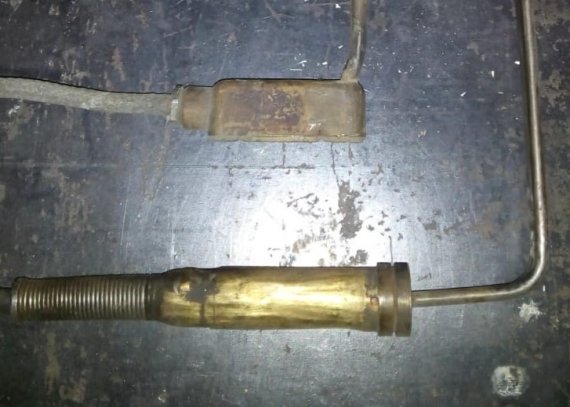
Maintenance of Asphalt Paver Screed Plates
The proper maintenance of screed plates is essential for maintaining the performance and efficiency of an asphalt paver. These critical components play a vital role in achieving precise and uniform pavement surfaces. By implementing a comprehensive maintenance routine, you can maximize the lifespan of your screed plates and ensure consistent quality in your asphalt paving projects.
- Regularly cleaning the screed plates is the first step in maintenance.
- Regular inspections are crucial to identify any signs of wear, damage, or misalignment in the screed plates.
- Proper alignment of the screed plates is vital for achieving uniform mat thickness and smoothness.
- Appropriate lubrication of the screed plate components is crucial for smooth operation and longevity.
-
Screed plates have a limited lifespan due to the harsh operating conditions and continuous wear they endure.
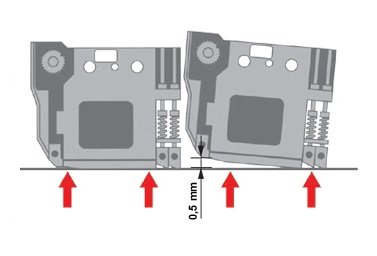
Adjusting the height of the withdrawable parts
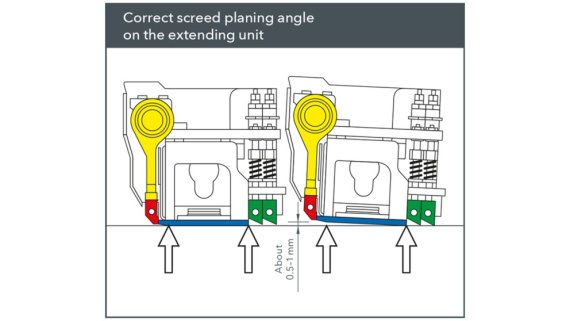
To ensure level alignment, set both withdrawable parts to zero position, aligning the main and sliding screed plates. Open chains connecting spindles for individual adjustments. Lower the implement onto withdrawable parts, using wooden blocks for added stability
Tamper bar
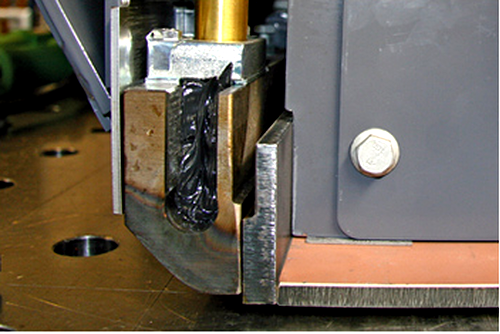
The tamping bar guides the paving mix under the screed by means of a vertical movement. In this way, it ensures an even material flow and the required degree of pre-compaction.
Due to the constant up-and-down movement and the continuous impact load, the tamper bar must be made of the highest quality materials.
A hard surface and a ductile core are important characteristics that the rammer should have a tamper bar.
|
Type of tamper bars
|
Description |
|---|---|
|
Standart tamper bars |
Standard Tamper Bars: Standard tamper bars are commonly used in asphalt paving projects. They provide uniform compaction and help achieve the desired density of the asphalt mix. These tamper bars are suitable for general paving applications and offer reliable performance. |
|
Vibration Tamper Bars |
Vibration Tamper Bars: Vibration tamper bars are equipped with vibratory mechanisms that enhance the compaction process. The vibrations generated by these bars help in achieving better surface smoothness and density. They are particularly useful in projects that require higher compaction levels and improved pavement quality. |
|
Combination Tamper Bars |
Combination Tamper Bars: Combination tamper bars offer a versatile solution by combining the benefits of standard tamper bars and screed vibration. These bars provide both downward pressure and vibrations, resulting in enhanced compaction efficiency and improved surface finish. They are suitable for projects that require a balance between compaction and smoothness. |
|
Specialty Tamper Bars |
Specialty Tamper Bars: In addition to standard, vibration, and combination tamper bars, there are specialty tamper bars designed for specific paving applications. These may include high-density tamper bars for heavy-duty projects or adjustable tamper bars for customized compaction requirements. Specialty tamper bars cater to unique project demands and offer tailored solutions. |
Maintenance of the clamping unit
To ensure optimal performance and longevity of tamper bars on your asphalt paver, it is important to follow a regular maintenance routine.
|
Maintenance tasks |
Description |
|---|---|
|
Daily Cleaning |
Perform a daily cleaning of the tamper bars to remove any debris or asphalt buildup. This helps prevent performance issues and ensures proper compaction. |
|
Lubrication: |
Lubricate the tamper bars every 50 operating hours or as recommended by the manufacturer. Use appropriate lubricants to ensure smooth operation and reduce wear. |
|
Regular Inspection: |
Regularly inspect the tamper bars for signs of wear, such as uneven wear patterns or damage. Promptly address any issues to prevent further damage and maintain optimal performance. |
|
Scheduled Maintenance: |
Perform scheduled checks and maintenance work as recommended by the manufacturer. This may include adjusting the tamping device lift, shaft height, and front attachment wall to ensure proper alignment and performance. |
|
Wear Check |
Regularly check the tamper bars for signs of wear. If any tamper bars show excessive wear or damage, replace them promptly to maintain optimal compaction results. |
Adjusting the hold-down
Changing the tamper bar lift.
Changing the tamper bar lift is a crucial adjustment in equipment maintenance, ensuring optimal performance. By altering the tamper bar lift, operators can control compaction depth, achieving desired levels of density in construction projects. This adjustment must be executed with precision to enhance efficiency and avoid potential damage to the machinery.
To maintain uniformity in the tamping bar lift throughout the paving width, adjustments are made by rotating the eccentric sleeve on the tamping bar shaft. This can be done during construction breaks, allowing for precise modifications behind the scenes. It is essential to ensure consistent lift levels for optimal paving performance.
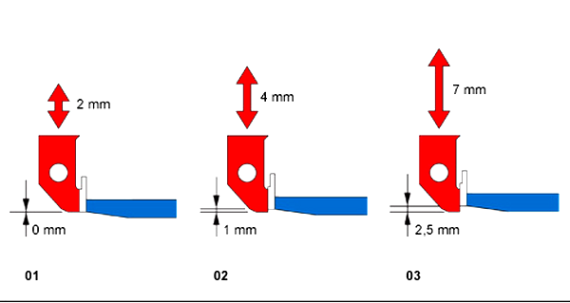
Adjusting the hold-down
|
The lift is 2 mm |
At the lowest point, the tamper bar is flush with the tamper plate. |
|
The lift is 4 mm |
At the lowest point, the tamper bar is max. 1 mm lower than the incline. |
|
The lift is 7 mm |
At the lower point, the tamper is 3.5 mm lower than the slope. |
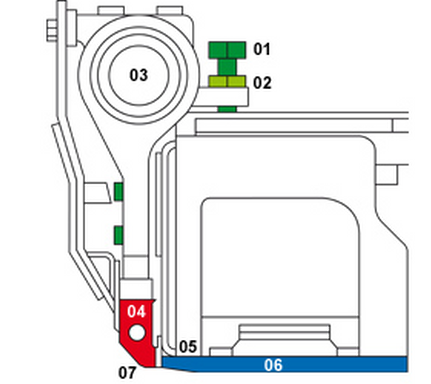
Ensure the proper adjustment of the tamping bar (03) by aligning it with the wear plate (01) uniformly across its entire width. Next, adjust the steel spring band (02) of the front wall using the screw (04) at the implement's rear. Create a gap of 0.5 - 1 mm between the tamping bar and the steel spring band. If needed, loosen screws (06), reposition the small shims (05), and adjust the front wall, aligning the steel spring band parallel or slightly inclined forward to the tamping bar. Recheck the distance between the tamper bar and the steel spring band, making additional adjustments as required. Tip: If the front wall of the implement appears spread out, follow the aforementioned steps to ensure proper alignment.
Pressing bars
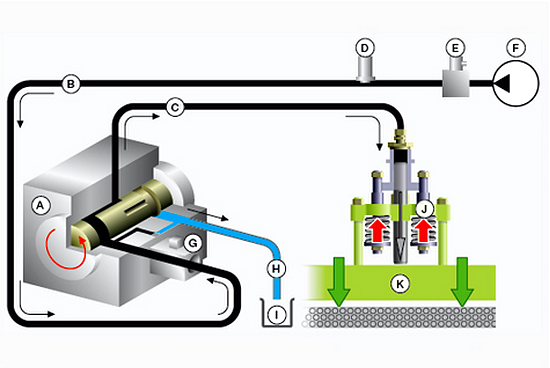
The baling bars, whether single (TP1) or double (TP2) variant, are hydraulically driven and experience similar operational stresses as the tamping bars. VÖGELE high compaction work tools are equipped with compression strips positioned behind the screed plates. These strips play a crucial role in completing the compaction process of the screed. By adjusting the arrangement of compression shims at the screed's end, the level of compaction can be varied independently of material feed and pre-compaction. It is important to note that worn press plate profiles can negatively impact the quality of compaction, failing to meet customer specifications. Therefore, maintaining proper press plate profiles is essential to achieve desired compaction results.
A. Rotating pulse generator
B. Constant mixture flow
C. Pulsating mixture flow
D. Pressure transmitter
E. Sequence valve
F. Gear pump
G. Pressure control
H. Return flow
I. Tank
J. Spring assembly
K. Pressing plate
